XenGamer's Guide to Building a Micro ATX Overclocking Monster Welcome, fellow PC enthusiasts, to XenGamer's comprehensive guide on building a Micro ATX (mATX) "Overclocking Monster"!
Welcome, fellow PC enthusiasts, to XenGamer's comprehensive guide on building a Micro ATX (mATX) "Overclocking Monster"! If you're tired of simply running games at their default settings and crave the thrill of pushing your hardware to its absolute limit, you've come to the right place. This build isn't just about gaming; it's about exploring the boundaries of your components and extracting every ounce of performance possible. Prepare to delve into the world of voltage tweaks, frequency adjustments, and thermal management as we transform a humble mATX system into a powerhouse capable of handling the most demanding tasks. So, buckle up, grab your screwdriver, and let's get started!
The AMD Ryzen 7 5700X, a powerhouse CPU known for its overclocking potential and excellent value.
1. Purpose: Unleash the Beast Within
This build is laser-focused on one goal: maximizing performance through overclocking. We're not just aiming for smooth frame rates in the latest games; we're striving for the absolute best possible experience. This means pushing our CPU, GPU, and RAM to their limits, squeezing out every last drop of performance for both gaming and other enthusiast tasks like video editing, content creation, and running demanding applications. Expect higher frame rates, faster rendering times, and an overall snappier system.
2. Core Components: The Heart of the Machine
Here’s the breakdown of the essential components that will form the foundation of our overclocking beast:
CPU: AMD Ryzen 7 5700X
The AMD Ryzen 7 5700X is our CPU of choice.
 The ASUS ROG Strix B550M-A Gaming, offering robust VRMs and essential BIOS features for overclocking.
Why? It strikes an excellent balance between price and performance, offering eight cores and sixteen threads, which provide ample power for both gaming and productivity. More importantly, it's known for its overclocking headroom, allowing us to push its clock speeds significantly beyond its base frequency. This is achieved by a good architecture and it's unlocked multiplier.
The ASUS ROG Strix B550M-A Gaming, offering robust VRMs and essential BIOS features for overclocking.
Why? It strikes an excellent balance between price and performance, offering eight cores and sixteen threads, which provide ample power for both gaming and productivity. More importantly, it's known for its overclocking headroom, allowing us to push its clock speeds significantly beyond its base frequency. This is achieved by a good architecture and it's unlocked multiplier.
Motherboard: ASUS ROG Strix B550M-A Gaming
This motherboard is crucial for a stable and successful overclock. The ASUS ROG Strix B550M-A Gaming boasts robust VRMs (Voltage Regulator Modules) that are essential for delivering clean and stable power to the CPU, especially when overclocking. It also features an intuitive BIOS with comprehensive overclocking options, allowing us to fine-tune voltages, clock speeds, and other critical settings. Furthermore, its mATX form factor perfectly aligns with our build goals of a compact yet powerful system.
RAM: 32GB (2x16GB) DDR4 3600MHz CL16 G.Skill Trident Z Neo
Memory is as important as every other component mentioned thus far, and the G.Skill Trident Z Neo is designed for AMD Ryzen processors.
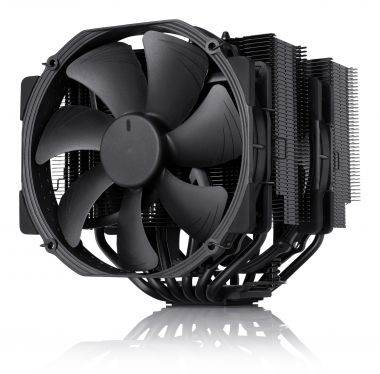
 The Noctua NH-D15 provides exceptional cooling performance, essential for maintaining stable overclocked CPU temperatures.
32GB ensures that we have plenty of memory for even the most demanding games and applications. The 3600MHz speed is the "sweet spot" for Ryzen 5000 series processors, offering excellent performance without stability issues. The CL16 timing (CAS Latency) indicates the speed which the memory can access stored data. Enable the XMP (Extreme Memory Profile) in the BIOS to automatically set the RAM to its advertised speed and timings.
GPU: NVIDIA GeForce RTX 3070 (or AMD Radeon RX 6700 XT)
The NVIDIA GeForce RTX 3070 (or AMD Radeon RX 6700 XT) is the graphics card we selected. This GPU provides a great balance between performance and power consumption. Select a model with a robust cooling solution. Models like the ASUS ROG Strix or MSI Gaming X Trio. A beefy cooler ensures that we can push the GPU's clock speeds without thermal throttling.
Storage: 1TB NVMe PCIe Gen4 SSD (e.g., Samsung 980 Pro)
A fast NVMe PCIe Gen4 SSD, like the Samsung 980 Pro, is essential for reducing game loading times and improving overall system responsiveness. The speed of Gen4 SSDs significantly reduces waiting times, and delivers a smooth and seamless experience.
PSU: 750W 80+ Gold Certified (e.g., Corsair RM750x)
The PSU is the backbone of any system. A 750W 80+ Gold certified PSU, like the Corsair RM750x, provides ample headroom for overclocking and ensures that all components receive stable power. Look for a PSU with a single-rail design, as this delivers power more efficiently and consistently.
Case: Fractal Design Meshify 2 Compact
The Fractal Design Meshify 2 Compact is a perfect choice for our mATX build.
 Excellent cable management contributes to proper airflow, essential for keeping the "Overclocking Monster" cool.
Its standout feature is its exceptional airflow, crucial for managing heat during overclocking. The mesh front panel allows for unrestricted airflow, keeping our components cool even under heavy loads. The mATX form factor ensures that our system remains relatively compact without sacrificing performance.
Excellent cable management contributes to proper airflow, essential for keeping the "Overclocking Monster" cool.
Its standout feature is its exceptional airflow, crucial for managing heat during overclocking. The mesh front panel allows for unrestricted airflow, keeping our components cool even under heavy loads. The mATX form factor ensures that our system remains relatively compact without sacrificing performance.
3. Optional Add-ons: Enhancing the Experience
While the core components provide the foundation for our overclocking monster, these optional add-ons elevate the build to the next level:
CPU Cooler: Noctua NH-D15
The Noctua NH-D15 is a top-tier air cooler that rivals many liquid coolers in terms of performance. Its dual-tower design and dual fans provide exceptional cooling capacity, allowing us to push our Ryzen 7 5700X to its limits without fear of thermal throttling. Installation is straightforward, and configuring the fans in a push-pull configuration optimizes airflow across the heatsink.
Case Fans: Noctua NF-A14 PWM (Intake) and NF-S12A PWM (Exhaust)
High-quality case fans are critical for maintaining consistent airflow throughout the system. Noctua NF-A14 PWM fans for intake provide excellent static pressure, drawing cool air into the case, while Noctua NF-S12A PWM fans for exhaust efficiently expel hot air. These fans are quiet and efficient, ensuring that our system remains cool and quiet even during intense gaming sessions.
Peripherals (Audio Focus): Sennheiser HD 660S and FiiO K5 Pro ESS
For an immersive audio experience, the Sennheiser HD 660S audiophile headphones combined with a FiiO K5 Pro ESS DAC/AMP combo deliver exceptional sound quality. The HD 660S headphones provide a detailed and balanced soundstage, allowing you to hear subtle audio cues in games. The FiiO K5 Pro ESS DAC/AMP provides the necessary power to drive the headphones and enhances the audio signal for a clearer and more dynamic sound.
Monitor: 27-inch 1440p 144Hz IPS
The LG 27GP850 monitor has a low response time. A high refresh rate, and IPS panel that has excellent color accuracy makes it the best of the best. This will help complement our build's performance capabilities.
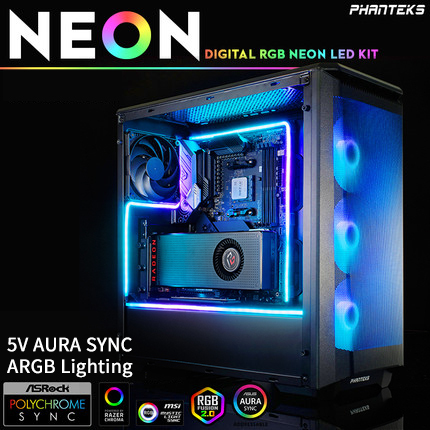
Subtle RGB Lighting: Phanteks Neon Digital RGB LED Strips
Add a touch of subtle RGB lighting using Phanteks Neon Digital RGB LED Strips. Use a color scheme of black, gray, and a single accent color (e.g., red) to enhance aesthetics without being overwhelming. Employ meticulous cable management techniques to keep the build clean and visually appealing.
4. Performance Expectations: Unleashing the Potential
Let's look at what we can expect from this build in terms of performance:
Games/Settings
- Cyberpunk 2077: High settings, Ray Tracing enabled
- Assassin’s Creed Valhalla: Ultra settings
Benchmarks
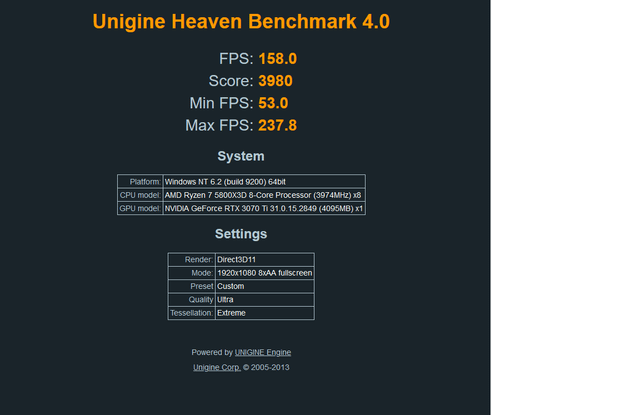 Estimated Cinebench R23 scores, highlighting the performance gains from overclocking the Ryzen 7 5700X.
- Cinebench R23 (Ryzen 7 5700X):
- Stock: Single-core: 1500, Multi-core: 12000
- Overclocked: Single-core: 1650, Multi-core: 13500
- 3DMark Time Spy (RTX 3070):
- Stock: 11000
- Overclocked: 12500
FPS Targets (1440p)
- Cyberpunk 2077:
- Stock: 60-70 FPS
- Overclocked: 75-85 FPS
- Assassin’s Creed Valhalla:
- Stock: 75-85 FPS
- Overclocked: 90-100 FPS
5. Cost/Value Analysis: The Sweet Spot
This build offers a compelling balance between performance and cost, making it ideal for enthusiasts who prioritize overclocking.
Justification
Each component has been selected to give you the best overclocking experience without breaking the bank.
Alternatives
If your budget allows, consider upgrading to a Ryzen 7 5800X3D or an RTX 3080 for even greater performance.
Cost Breakdown (Estimated)
- CPU: $200
- Motherboard: $180
- RAM: $120
- GPU: $400
- Storage: $90
- PSU: $100
- Case: $90
- CPU Cooler: $100
- Case Fans: $50
- Total: $1330
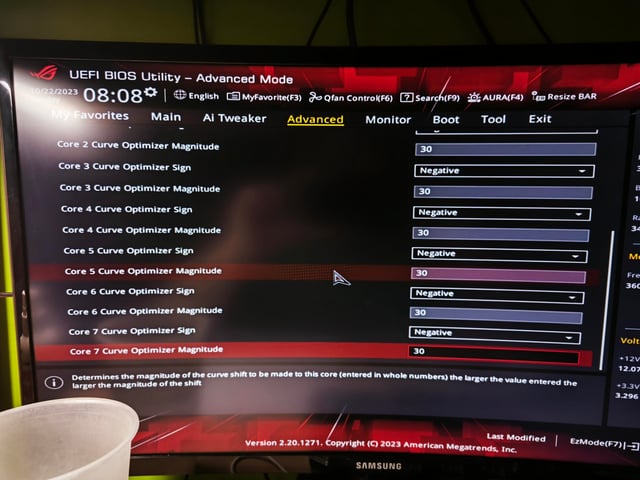
6. Overclocking Guide: Pushing the Limits
Now for the fun part! Here’s how to overclock your Ryzen 7 5700X on the ASUS ROG Strix B550M-A Gaming motherboard:
 AMD Ryzen Master provides a user-friendly interface for monitoring and tweaking CPU settings during overclocking.
BIOS Settings
- Enter the BIOS by pressing
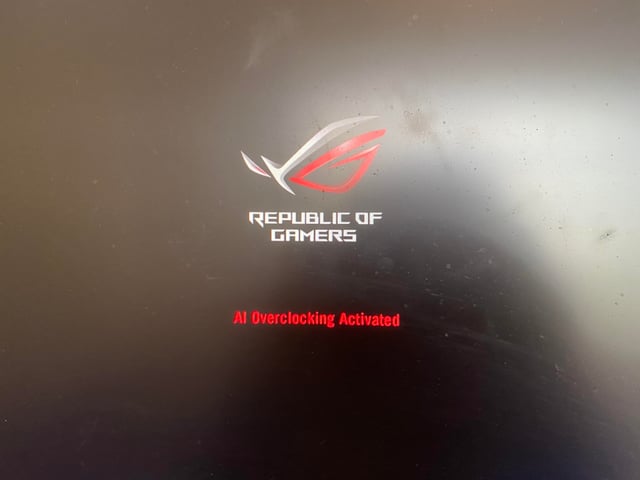
Deleteduring startup. - Navigate to the "Extreme Tweaker" or "Ai Tweaker" section.
- Set "Ai Overclock Tuner" to "Manual."
- Adjust the "CPU Core Ratio" to increase the CPU clock speed. Start with a modest increase, such as 4.5 GHz (45.00 multiplier).
- Adjust the "CPU Core Voltage" to provide more power to the CPU. Start with a slight increase, such as 1.30V.
- Enable "XMP" for your RAM to run at its advertised speed.
- Save the changes and exit the BIOS.
Software Tools
- AMD Ryzen Master: Monitor CPU temperatures, voltages, and clock speeds.
- HWMonitor: Provides detailed information about all system components.
Overclocking Steps
- Increase the CPU clock speed in small increments (e.g., 0.05 GHz).
- Test stability using benchmarks like Cinebench R23.
- Monitor temperatures using AMD Ryzen Master or HWMonitor.
- Adjust fan curves in the BIOS to ensure optimal cooling.
- If the system is unstable, increase the CPU voltage slightly.
Stress Testing
Use Prime95 and AIDA64 to stress test the CPU and memory. Run these tests for several hours to ensure stability.
Voltage Control
Keep CPU voltage below 1.35V to prevent damage. Exceeding safe voltage limits can significantly reduce the lifespan of your components.
7. Troubleshooting: When Things Go Wrong
Overclocking isn't always smooth sailing. Here’s how to troubleshoot common issues:
Instability
- System Crashes: Reduce the CPU clock speed or increase the CPU voltage.
- Blue Screens: Indicate a more serious problem. Revert to previous settings.
- Freezes: Often caused by unstable memory. Adjust memory timings or reduce memory clock speed.
Thermal Throttling
Monitor CPU temperatures. If the CPU reaches 90°C or higher, it may be thermal throttling. Adjust fan curves or improve cooling.
Voltage Adjustments
Fine-tune voltages to achieve a stable overclock without overvolting. The goal is to find the lowest possible voltage that provides stable performance.
Memory Errors
Diagnose and fix memory errors by adjusting memory timings or reducing memory clock speed.
BIOS Reset
Reset the BIOS to default settings if the overclock is unstable. This can be done by clearing the CMOS jumper on the motherboard.
8. Upgrade Paths: Future-Proofing Your Rig
Consider the following upgrade paths to keep your system current:
Future Upgrades
- GPU: Upgrading to a newer GPU (e.g., RTX 4070 or RX 7700 XT) will significantly improve gaming performance.
- CPU: When available, upgrading to a more powerful CPU (e.g., Ryzen 7 5800X3D or a next-generation Ryzen processor) will provide a substantial performance boost.
Compatibility Notes
Ensure that any new components are compatible with your motherboard and PSU. Check the motherboard's supported CPU list and the PSU's wattage capacity before upgrading.
 The Sennheiser HD 660S headphones and FiiO K5 Pro ESS DAC/AMP combo deliver exceptional audio quality, enhancing gaming immersion.
9. Conclusion: Embrace the Power
Congratulations, you've built a Micro ATX Overclocking Monster! This system is designed to push your components to their limits, delivering unparalleled performance in both gaming and enthusiast tasks. By carefully selecting each component and meticulously overclocking them, you've created a machine that truly lives up to its name. Embrace the power and enjoy the thrill of maximizing your hardware's potential. Happy overclocking!
 Overclocking enhances visual fidelity and performance in demanding games like Cyberpunk 2077, with Ray Tracing enabled.
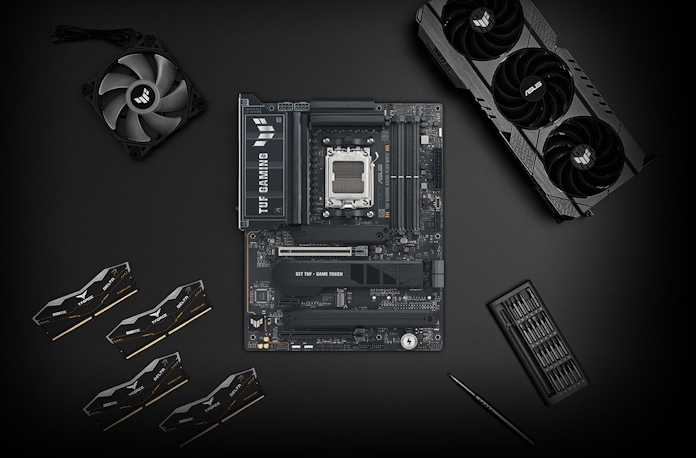
 All the essential components laid out, ready for assembly into a potent mATX "Overclocking Monster".
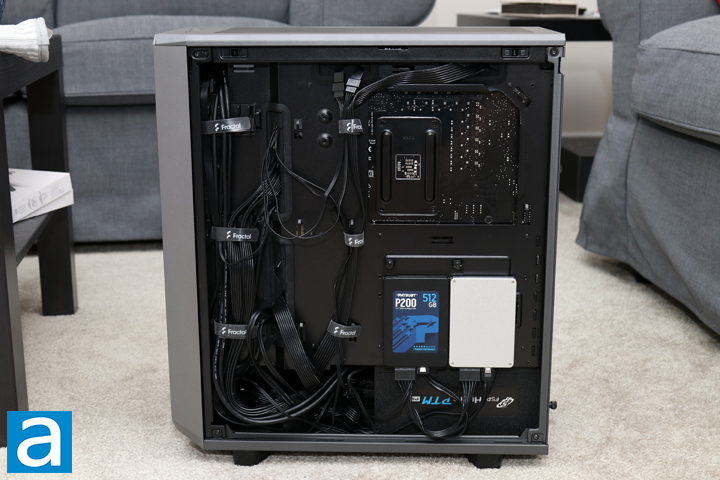
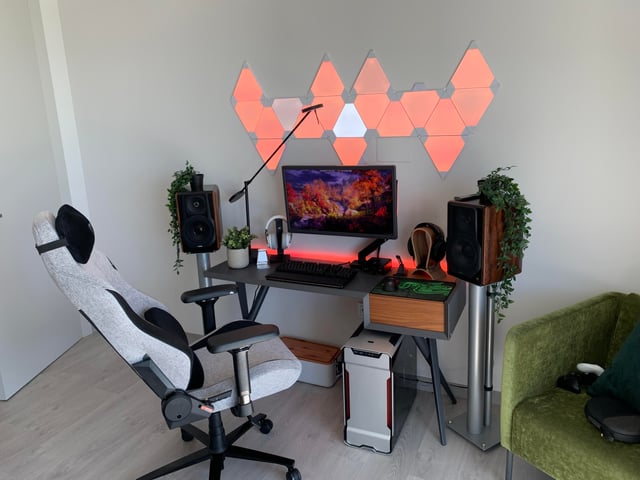
 The finished build inside the Fractal Design Meshify 2 Compact, showcasing clean aesthetics and powerful overclocked hardware.