Slaying the Devil Himself: A XenGamer's Guide to Defeating Raphael in Baldur's Gate 3 So, you’ve reached the House of Hope in Baldur's Gate 3, and now you're staring down the barrel of a full-blown infernal showdown with Raphael.

So, you’ve reached the House of Hope in Baldur's Gate 3, and now you're staring down the barrel of a full-blown infernal showdown with Raphael. This ain't your average goblin skirmish, folks. This is a multi-phase boss fight against a devil with a penchant for theatrics and an army of minions at his beck and call. Many consider this the toughest fight in the game outside of Honour Mode. Forget everything you think you know about RPG boss battles, because Raphael is about to test your party composition, your tactical acumen, and your gear to their absolute limits. This guide, tailored for the discerning XenGamer, provides the practical, efficient, and expert advice you need to emerge victorious. Recommended level: 12. Gear score: As high as you can manage, with a focus on radiant damage and fire resistance.
Context: The Devil You Know (and Need to Kill)
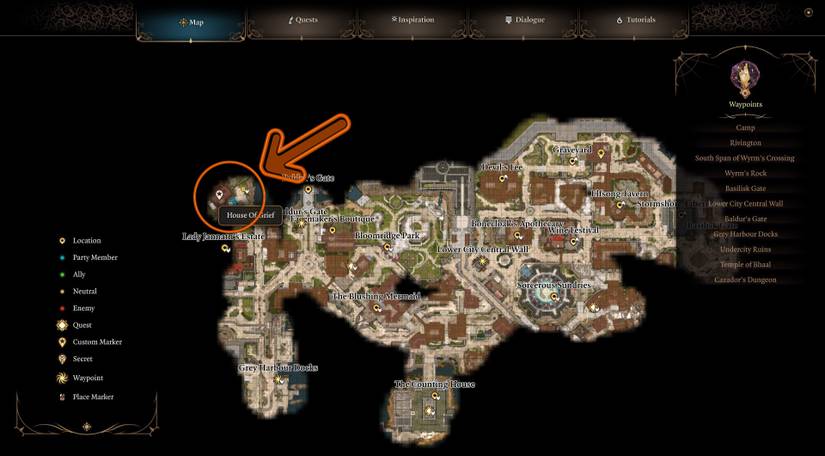
The "Defeat Raphael" quest becomes available once you confront him about the Orphic Hammer. This confrontation usually happens within the House of Hope, a sub-location within the game world accessible via a portal opened with Helsik in the Lower City of Baldur's Gate. Raphael believes the Orphic Hammer is his by right, and he's not exactly thrilled you're planning on using it.
The House of Hope isn't just some empty room; it's his house, his domain, and he’s stacked the deck in his favor. Your objective is simple: retrieve the Orphic Hammer (if you haven't already), free Hope (if you choose to), and then put Raphael down for good. This fight is significant because it impacts the ending you'll get regarding the fate of the Emperor and Prince Orpheus. It’s a brutal test, but the rewards – both in terms of story and loot – are well worth the effort.
Step-by-Step Strategy: A Symphony of Destruction
This fight is a marathon, not a sprint. Understanding the phases and Raphael's abilities is key.
Phase 1: The Opening Act
Positioning is Paramount: Before initiating the fight, spread your party out. Raphael starts on his throne in the center of the room, surrounded by four Soul Pillars. These pillars are your primary targets. Raphael gains buffs from these pillars, so destroying them early is critical. Place your heaviest hitters (Fighters, Paladins, Barbarians) near the pillars. Place your casters and ranged attackers near the edges of the arena to keep your distance from melee units like the Cambions and the Hellhound, which will rush you immediately.
Target the Soul Pillars: Focus all your firepower on the Soul Pillars first. They grant Raphael significant buffs and constantly heal him, making him nearly invulnerable until they're destroyed. Use spells like Shatter, Magic Missile, and high-damage single-target attacks to bring them down quickly. Consider using the Orphic Hammer on a pillar for massive damage.

Control the Minions: Cambions and a Hellhound will engage you. Crowd control spells like Hold Person, Hypnotic Pattern, and Web are invaluable for keeping them at bay while you focus on the pillars. Prioritize the Cambions, as they can deal significant damage and inflict the Burning condition.
Phase 2: The Devil's Due
Raphael's True Form: Once the Soul Pillars are destroyed, Raphael transforms into his Ascended Devil form. This is where the fight truly begins.

Burning and Radiant Damage: Raphael is highly resistant to most damage types, but he's vulnerable to radiant damage. Gear and spells that inflict radiant damage are your best bet. He is also weak to being burning, so use spells and skills to light him up.
Maintain Distance: Raphael is a powerful melee combatant. Keep your squishier characters at range and focus on ranged attacks and spells. Use terrain to your advantage, creating chokepoints and lines of sight.
Incubus Reinforcements: Halfway through the fight, Raphael summons 4 incubi. Deal with them ASAP. These can charm your party members, so kill them fast!
Phase 3: The Finale
- Korahk's Intervention: Periodically, Korahk, the Hope Consort, will attempt to buff Raphael. Quickly eliminate him to prevent this.
- Conserve Resources: By this point, you've likely burned through many of your high-level spell slots and potions. Focus on maximizing your remaining resources and utilizing basic attacks and cantrips.
- Persistence is Key: This fight is a grind. Don't get discouraged if your party members fall. Focus on reviving them strategically and maintaining a consistent stream of damage. Keep chipping away at his health, and eventually, you'll bring him down.
Tips and Tricks: XenGamer Level Optimization
Pre-Buffing is Essential: Before initiating the fight, cast every buff you can think of: Haste, Bless, Freedom of Movement, Death Ward, etc. These buffs can provide a significant edge in the early stages of the fight.
Yurgir the Oathbreaker: If you convinced Yurgir to break his contract in the Gauntlet of Shar, you can summon him as an ally during this fight. He's a powerful melee combatant and can soak up a significant amount of damage.
Hope is a Powerful Ally: Freeing Hope before the fight grants you access to her healing abilities, which can be a lifesaver. She can also cast powerful support spells like Mass Healing Word and Greater Restoration.
Radiant Gear: Prioritize equipping your party with weapons and armor that deal radiant damage. The Blood of Lathander mace is an excellent choice for your melee fighters.
Fire Resistance: This one seems obvious, but fire resistance potions and gear are crucial for mitigating Raphael's fire-based attacks.

Exploit (Potentially): Some players have reported that pushing Raphael off the edge of the platform can instantly kill him. However, this may be considered an exploit and may not always work. Use at your own risk.
PC-Specific Notes: Optimizing for Peak Performance
Control Scheme: Remap your hotkeys for quick access to essential spells and abilities. Consider using a gaming mouse with programmable buttons for even faster access.
Graphics Settings: If you're experiencing performance issues, lower your shadows, lighting, and particle effects. These settings can significantly impact your frame rate, especially during a chaotic boss fight like this. On Nvidia cards, disable NVIDIA DLSS if you are experiencing graphical glitches. On AMD cards, ensure FidelityFX Sharpening is enabled.
Mods: While Baldur's Gate 3 is a fantastic game on its own, certain mods can enhance the experience. Consider installing the following mods via Nexus Mods:
- ImprovedUI: Improves the user interface for better clarity and usability. Installation: Download the mod from Nexus Mods. Use a mod manager like BG3 Mod Manager to install the mod.
- Party Limit Begone: If you want to bring more than four characters into the fight, this mod removes the party size limit. Installation: Download the mod from Nexus Mods. Use a mod manager like BG3 Mod Manager to install the mod.
- Native Camera Tweaks: For better control of the camera during the encounter. Installation: Download the mod from Nexus Mods. Use a mod manager like BG3 Mod Manager to install the mod.
Performance Issues: Ensure your graphics drivers are up to date. Baldur's Gate 3 is a demanding game, and outdated drivers can cause performance issues. Regularly clearing your shader cache can also help.
Conclusion: Spoils of War and Infernal Defeat
By defeating Raphael, you gain several significant rewards:
The Orphic Hammer: Essential for progressing the main story and freeing Prince Orpheus.
Raphael's Armor: A very rare set of armor that provides excellent protection and unique bonuses.
Experience Points: A substantial amount of experience points that will help you level up your party.
Story Advancement: Completing this quest significantly impacts the ending of the game.
Moloch's Deal: If you spared Moloch in Act 1, it may come back to haunt you in this fight.

Mastering the strategies outlined in this walkthrough will not only help you defeat Raphael but will also improve your overall tactical skills in Baldur's Gate 3. Remember, preparation, positioning, and resource management are key to success. Now go forth, XenGamers, and send that devil back to the Nine Hells where he belongs!