Night City Enhanced: A Cyberpunk 2077 Visual and Gameplay Overhaul Modding Guide Cyberpunk 2077 has come a long way since its initial release.
Cyberpunk 2077 has come a long way since its initial release. Patches have addressed many of the most glaring issues, but for PC gamers, the real magic lies in the world of modding. This guide isn't about fixing a broken game; it's about taking a good game and making it exceptional. We're diving deep into the world of Cyberpunk 2077 mods to enhance its visual fidelity and correct remaining gameplay flaws, creating the definitive Night City experience. Get ready to rebuild Night City, one mod at a time.
Overview: Rebuild Night City – Enhancing Visuals and Fixing Gameplay in Cyberpunk 2077
This guide is your one-stop shop for transforming Cyberpunk 2077 into a truly breathtaking and engaging experience. We'll cover everything from installing visual enhancement mods that overhaul textures and lighting to implementing community-created fixes that address aspects like police AI and vehicle handling. Whether you're looking to squeeze every last drop of graphical fidelity from your rig or simply want to smooth out some of the game's rough edges, you've come to the right place. We will focus on improving the Cyberpunk 2077 graphics and fixing the game with Cyberpunk 2077 gameplay mods.
Requirements: Tools for a Better Night City
Before we begin, let's gather the necessary tools.
- Cyberpunk 2077: A legal copy of the game is mandatory, of course. This guide assumes you have the game installed and running on your PC.
- WolvenKit: This is the essential tool for installing and managing Cyberpunk 2077 mods. You can download the latest stable release from the official GitHub page: WolvenKit GitHub.
- (Optional) Notepad++: While not strictly required, a good text editor like Notepad++ is highly recommended for manually editing configuration files. It's free and offers superior syntax highlighting and functionality compared to the default Windows Notepad.
Step-by-Step Instructions: From Glitch to Gorgeous
Now that we have our tools, let's get modding!
Installing WolvenKit:
- Head over to the WolvenKit GitHub releases page.
- Download the latest stable release (usually the one without "pre-release" or "alpha" in the name) in
.zipformat. - Extract the contents of the
.zipfile to a location of your choice. A dedicated folder likeC:\WolvenKitis recommended. - Run
WolvenKit.exe. - The first time you run WolvenKit, it might ask you to specify the Cyberpunk 2077 game directory. Make sure to point it to the correct location (e.g.,
C:\Program Files (x86)\Steam\steamapps\common\Cyberpunk 2077). - Once WolvenKit is open, you should see a screen similar to the screenshot below.
Finding Visual and Gameplay Mods:
Nexus Mods is your best friend here. Here are some recommended mods to get you started. Always check the mod pages for specific installation instructions and compatibility notes.
- Cyberpunk 2077 HD Reworked Project: This is a comprehensive high-resolution texture pack that significantly improves the visual fidelity of the game. Cyberpunk 2077 HD Reworked Project
- Better Vehicle Handling: Improves the often-criticized vehicle physics, making driving feel more responsive and enjoyable. Better Vehicle Handling
- AI Netrunners Enhanced: Improves the combat effectiveness of Netrunner enemies, providing a more challenging and immersive experience. AI Netrunners Enhanced
- Immersive First Person: Adds missing animations for activities like using inhalers or eating, improving the immersion of the first-person perspective. Immersive First Person
- Realistic Reshade: Enhances colors and lighting, creating a more cinematic and visually appealing look. Realistic Reshade
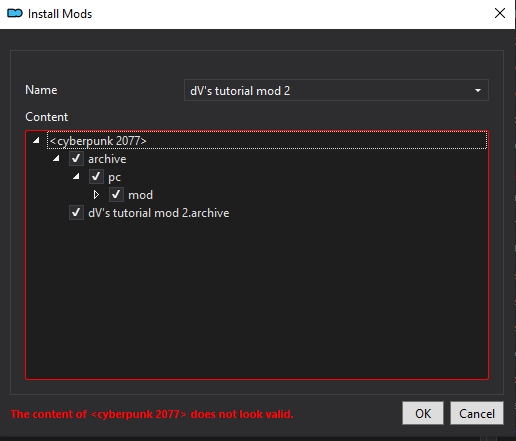
Installing Mods with WolvenKit:
- Open WolvenKit.
- Click "New Project" and give your project a name (e.g., "MyMods").
- Navigate to the "archive/pc/mod" folder within your newly created project directory. This folder is where you'll place your downloaded mod files. The path will resemble
C:\WolvenKit\projects\MyMods\archive\pc\mod. - Copy the downloaded
.archivefiles (from the mods you downloaded in the previous step) into this folder.

Activating Mods:
- In WolvenKit, click "Pack Project".
- Select the "Mod" option. This tells WolvenKit to create new
.archivefiles specifically for modding. - WolvenKit will then generate new
.archivefiles in theCyberpunk 2077root directory, inside a new folder named something similar toarchive\pc\modded. These are the files the game will load. - Ensure you copy these modded .archive files from the Wolvenkit output folder (
archive\pc\modded) into thearchive\pc\modfolder in your Cyberpunk 2077 game directory.

Launching the Game:
That's it! Launch Cyberpunk 2077 through Steam as usual. No special launch options or configurations are required. The game will automatically load the modified
.archivefiles.
Troubleshooting: Surviving the Mean Streets of Modding
Modding can sometimes be a bumpy ride. Here are some common issues and how to resolve them.
Performance Issues (Stuttering, Low FPS):
Demanding graphics mods, especially texture overhauls and ray tracing tweaks, can significantly impact performance. Lower your in-game graphics settings, especially ray tracing settings, and monitor your CPU/GPU usage. Open the in-game console (you may need to install Cyber Engine Tweaks, see "Extra Tips") and enter
perfoverlay.enable 1to display an overlay showing your average FPS, CPU usage, GPU usage, and RAM usage.
Visual Artifacts (Texture Flickering, Missing Textures):
These issues can arise from mod conflicts or corrupted files. First, verify the integrity of game files through Steam (right-click on the game -> properties -> local files -> verify integrity of game files). This will re-download any corrupted or missing files. Next, try re-installing mods one at a time to identify the source of the problem. Check the specific installation order requirements on the mod page – Reshade, in particular, often needs specific setup steps.
Game Crashing on Startup:
Crashes are often caused by mod incompatibilities or outdated drivers. Update your graphics drivers via NVIDIA GeForce Experience or AMD Adrenalin. If that doesn't work, disable mods one by one within WolvenKit, repack the project, and relaunch the game to identify the culprit.
Mod Conflicts:
WolvenKit includes a conflict finder. Go to Tools -> Conflict Browser to identify problems. WolvenKit displays file conflicts and provides options for overwriting files (one mod's file completely replaces another) or merging them (combining aspects of both files - advanced, requires knowledge of the files). If you don't know how to merge the files, pick the one you want the most to overwrite the others.
How to check installation:
The HD Reworked Project significantly improves the textures of walls throughout Night City. Find a specific wall near V's apartment in the Megabuilding H10. Take a screenshot before installing the mod, and compare it to the same wall after installing the mod to confirm the mod is working.
Extra Tips: Becoming a Cyberpunk Mod Master
Configuration File Tweaking:
You can further customize the game's behavior by editing the configuration file,
user.settings, located in%USERPROFILE%\Saved Games\CD Projekt Red\Cyberpunk 2077. A common tweak is adjusting the "TextureStreamingMemory" setting to increase texture streaming memory for better performance with high-resolution textures. Start with a value of "2048" (2GB) and increase it in increments of 1024 (1GB) until performance degrades.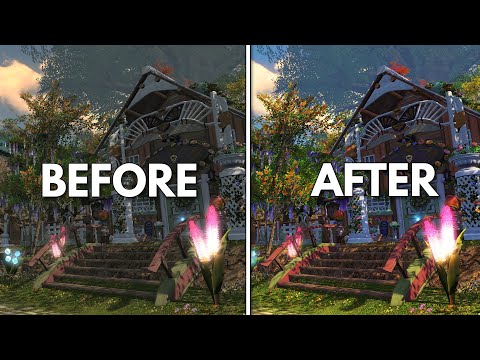
Recommended Mod Combinations:
Combine "Cyberpunk 2077 HD Reworked Project" with "Realistic Reshade" for maximum visual impact. Pair "Better Vehicle Handling" with a traffic density mod for a more immersive driving experience.
Hardware Considerations:
Users with high-end GPUs (e.g., RTX 3080 or better) can comfortably run most graphics mods at maximum settings. Users with mid-range GPUs (e.g., RTX 2060) may need to lower in-game graphics settings or use less demanding texture packs. Users with older or low-end GPUs may experience significant performance issues with graphics mods and should focus on gameplay enhancements instead.
Using the console:
Install the "Cyber Engine Tweaks" mod to enable the debug console. After installing, access the console by pressing the
~key. Use the commandGame.SetTime(20, 0, 0)to skip forward to 8 PM to easily test lighting mods.
Conclusion: Your Night City, Your Way
Modding Cyberpunk 2077 is a fantastic way to tailor the game to your personal preferences and hardware capabilities. By following this guide, you can transform Night City into a visually stunning and engaging world. Experiment with different mods, tweak your settings, and discover the ultimate Cyberpunk 2077 experience. So go forth, choomba, and make Night City your own! Remember to always check mod pages for specific installation instructions and compatibility notes, and don't be afraid to experiment. The world of Cyberpunk 2077 modding is vast and rewarding. Good luck, and have fun!